- Connect the TV box to the TV using the supplied HDMI cable.
- Connect the power adapter to the TV box and plug it in a power socket.
- Make sure the TV is turned on.
- Select the TV input to which the TV box is connected to.
- Once the connection is successfully established, the Welcome Assistant will appear on the TV screen.
Once you have connected your TV Box Android to your TV and power source (see “First Installation” > “Connecting to the TV Set”) your TV Box Android will initiate the setup process.
After booting up for the first time, pressing any button on the remote control will trigger the automatic connection between your remote control and the TV Box Android.
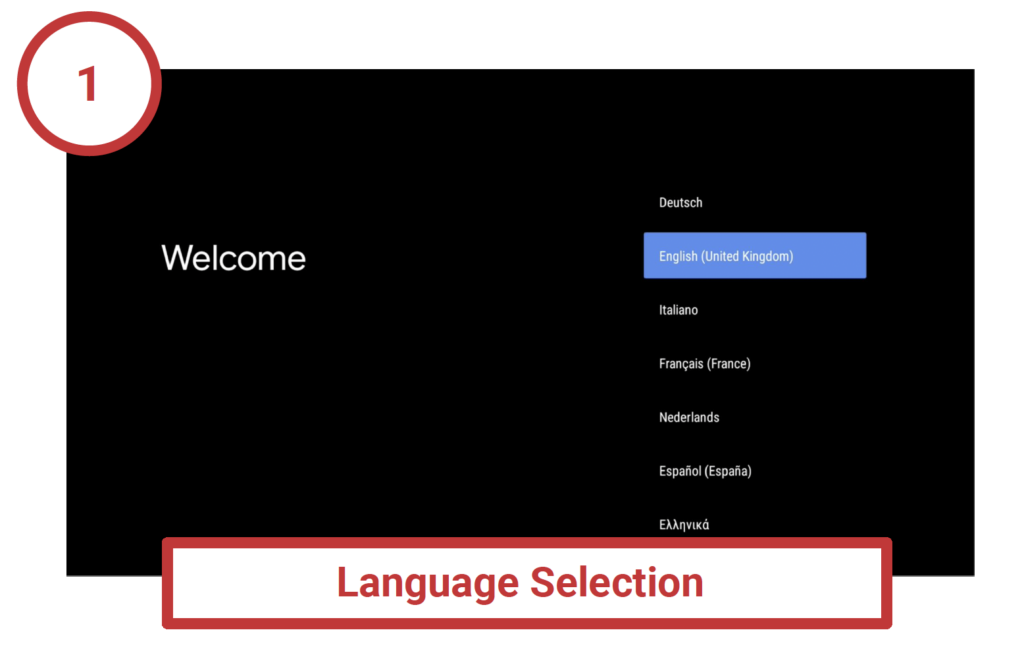
You may then choose your preferred language. The TV app supports the following languages:
- Englisch
- German
- French
- Italian
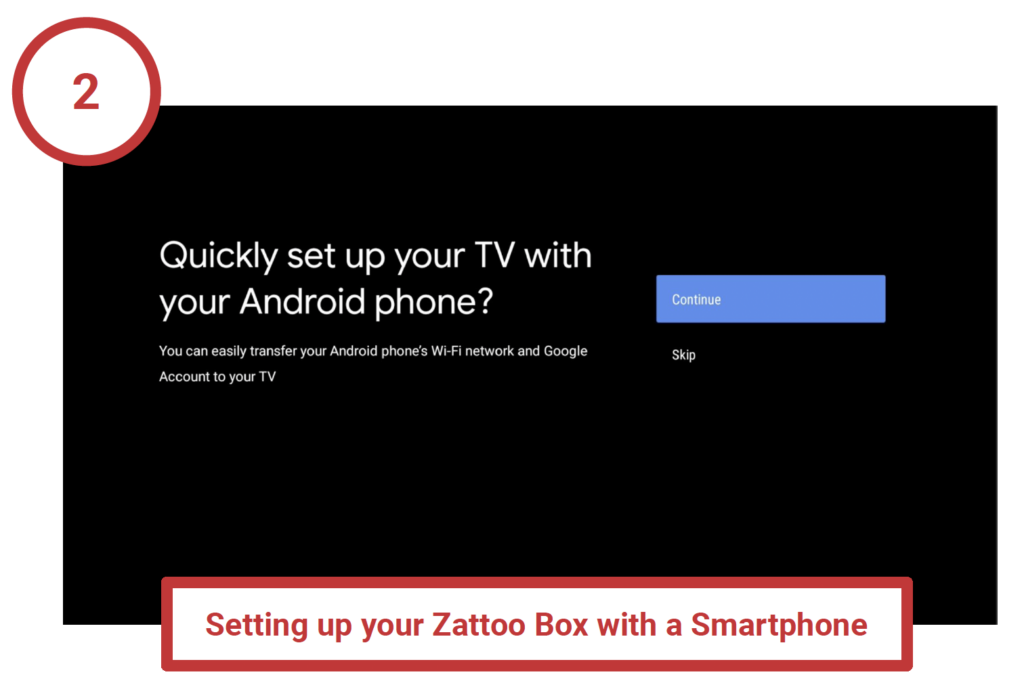
If you have a smartphone, you can use it to quickly and easily transfer Wi-Fi passwords and your Google Account to the TV Box Android.
To do this, ensure that Wi-Fi and Bluetooth are enabled on your smartphone.
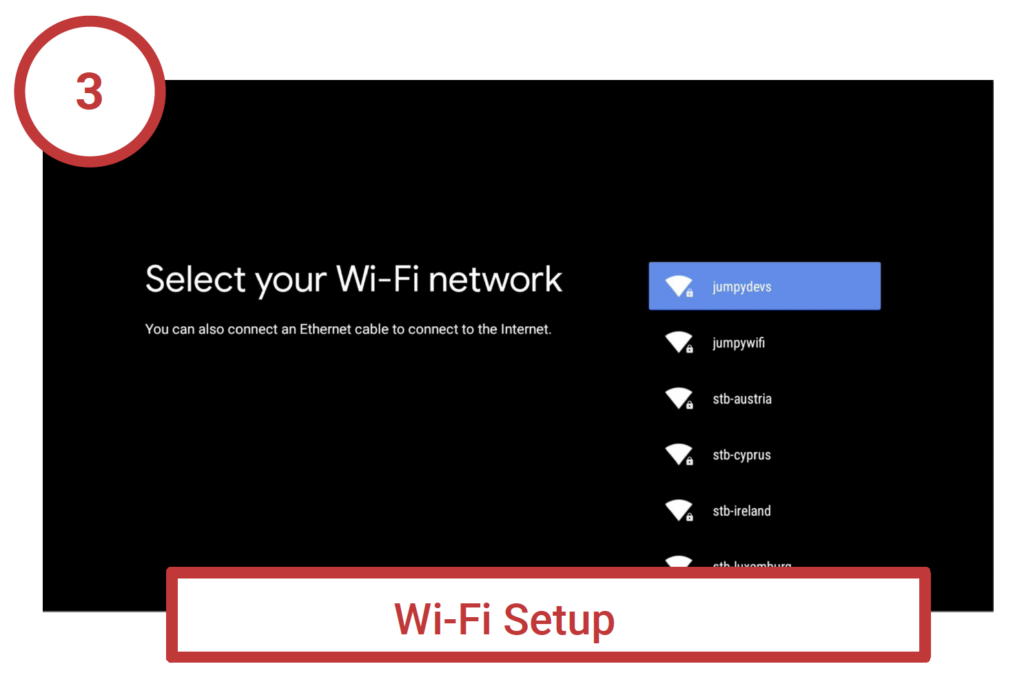
For the best and uninterrupted TV experience, we recommended to connect your TV Box Android to the internet using a Ethernet cable.
If you prefer to set up your TV Box Android manually for Wi-Fi, you will now be prompted to connect to a home network. Select your desired Wi-Fi network from the list and follow the on-screen instructions to establish the connection
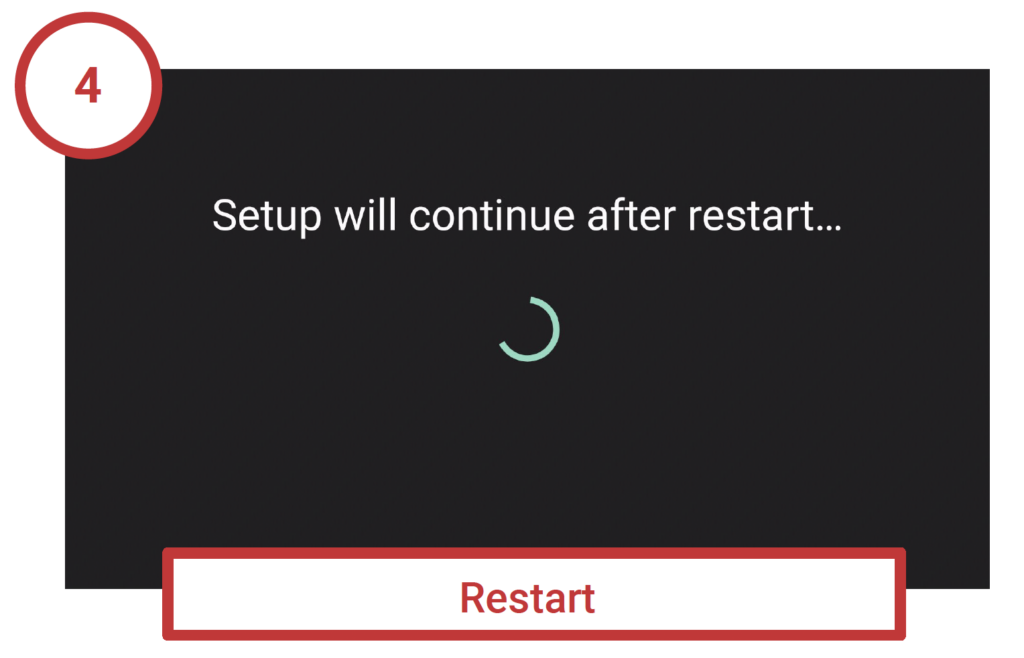
Once the network connection is successfully established, some basic settings will be transferred to your TV Box Android. This latter will automatically restart at the end of this step. This process may take a few moments. Please do not power off the TV Box Android during this process.
After restart, you will be asked to confirm your language and network settings one more time.
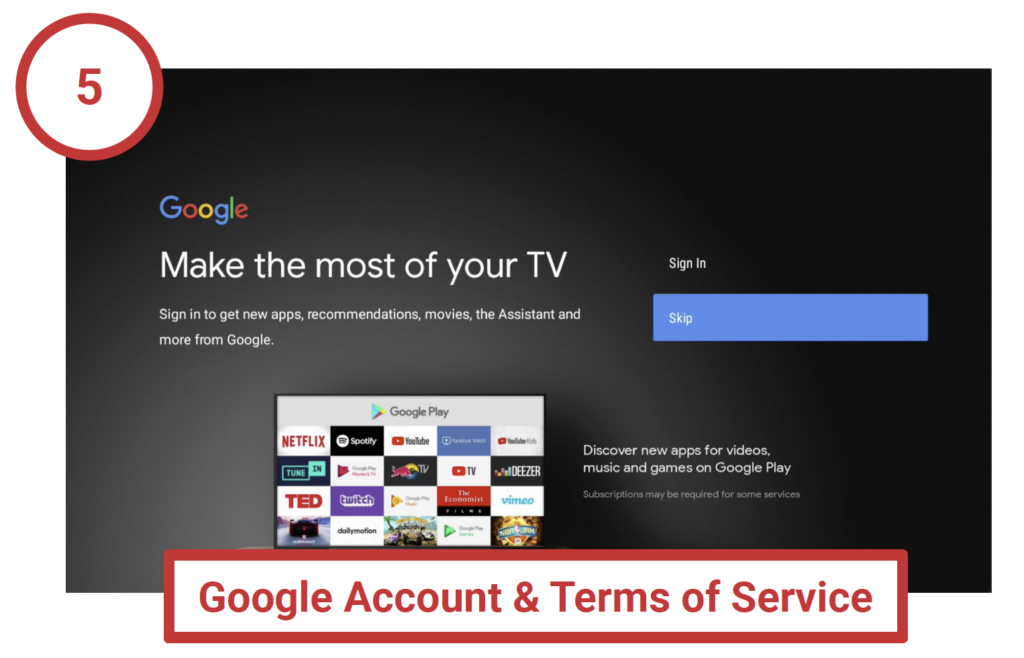
Follow the on-screen instructions to set up a Google Account on your TV Box Android if desired.
A Google Account is not required to use the TV Box Android.
You can also add a Google Account to the device later at any time in the system settings.
Please note: regardless of whether you decide to add a Google Account, you will be shown the Google Terms of Service and Privacy Policy. Please accept these to complete the setup.
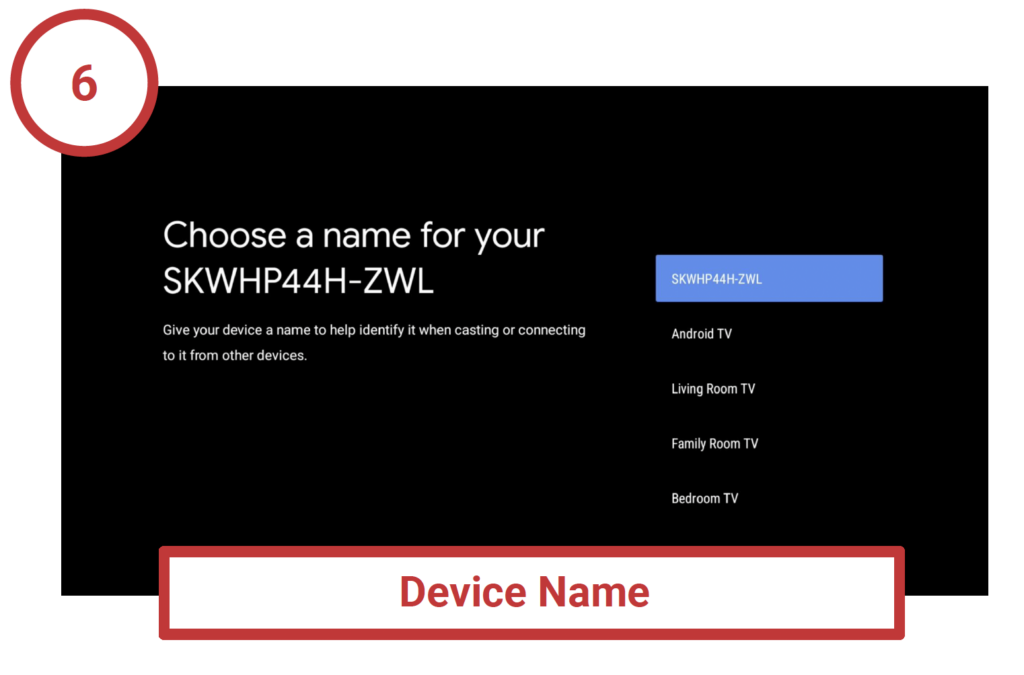
You can now assign a name to your TV Box Android. This can help you locate the device in your network later on.
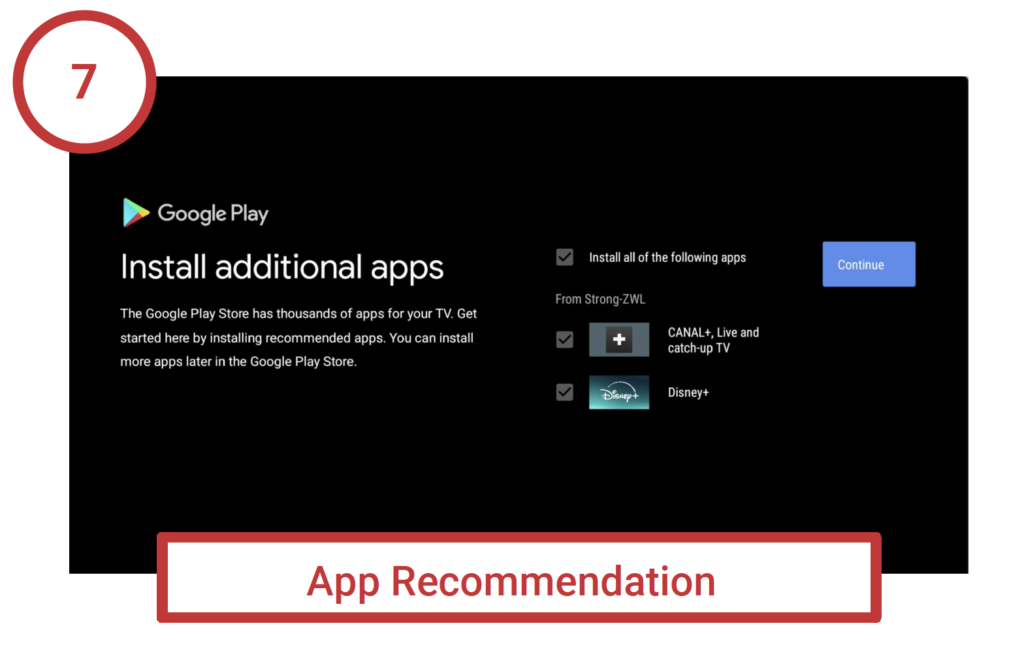
In the next step, you can decide whether you want to install all of the suggested apps, only a few of them, or none at all.
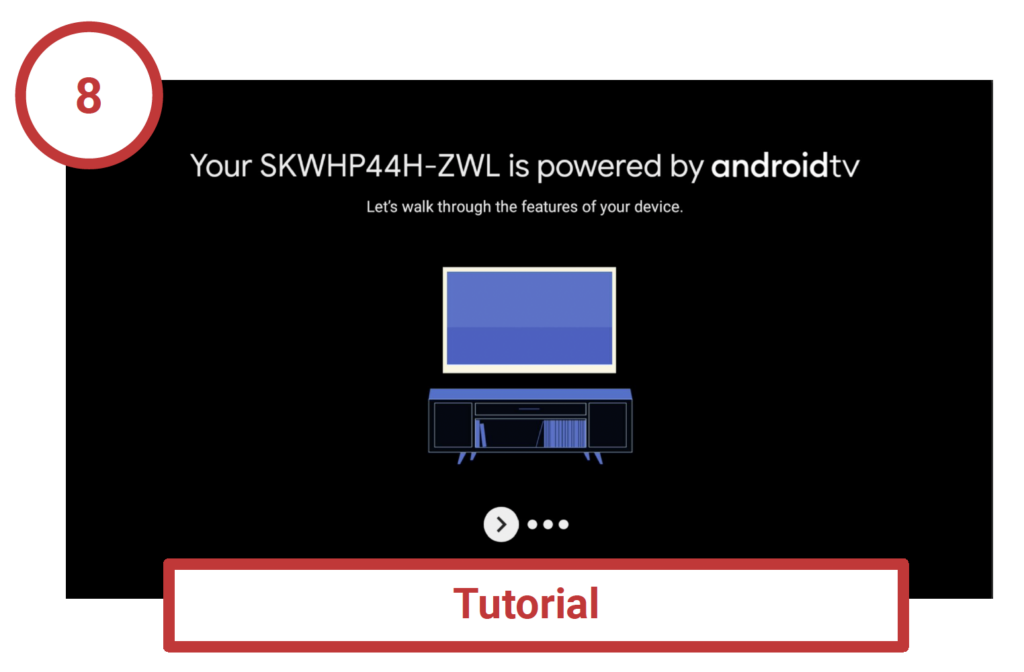
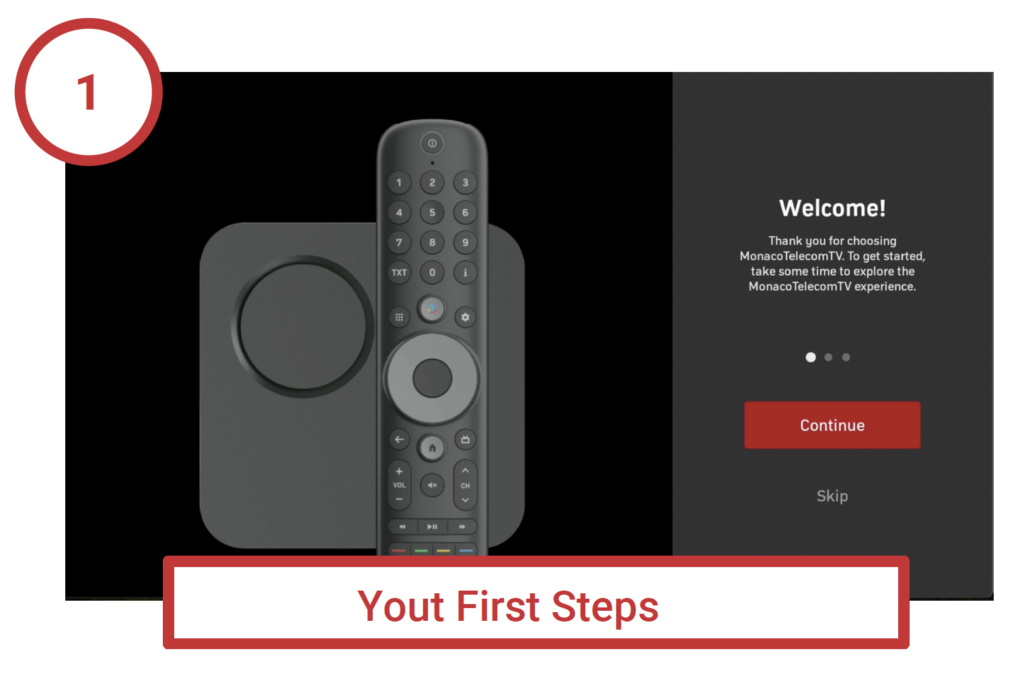
In the final step of the setup process, you have the option to familiarize yourself once again with the key features step by step
After the initial setup of your TV Box, you will be automatically logged into MonacoTelecomTV application.
To use your TV Box, it must be connected to the internet in your home network (see “First Installation” > “Initial Setup”).
Switch on your TV Box using the power button on the provided remote control. After a brief moment, you will be automatically logged in.
If something goes wrong, please ensure that your TV is turned on and correctly connected to the TV Box via the HDMI cable (see “First Installation” > “Initial Setup”).
The operation status of the TV Box is indicated by the LED light. The LED light will be white when the box is turned on and red in standby mode.
The TV Box is in the initial setup process when the LED light is white and approximately 60 seconds after powering on the device from deep standby mode. If you‘re switching on from active standby mode, the device should be up and running after approximately 10 to 15 seconds.
After logging into the MonacoTelecomTV app, you will be taken on a virtual tour to familiarize yourself with the key functions of the remote control.
Follow the on-screen instructions to complete the tour.
For a quick overview of all the functions of the remote control, see “MonacoTelecomTV Features” > “Remote Control”.
Once the tour is completed, you can start enjoying MonacoTelecomTV
Main controls, navigation and selection
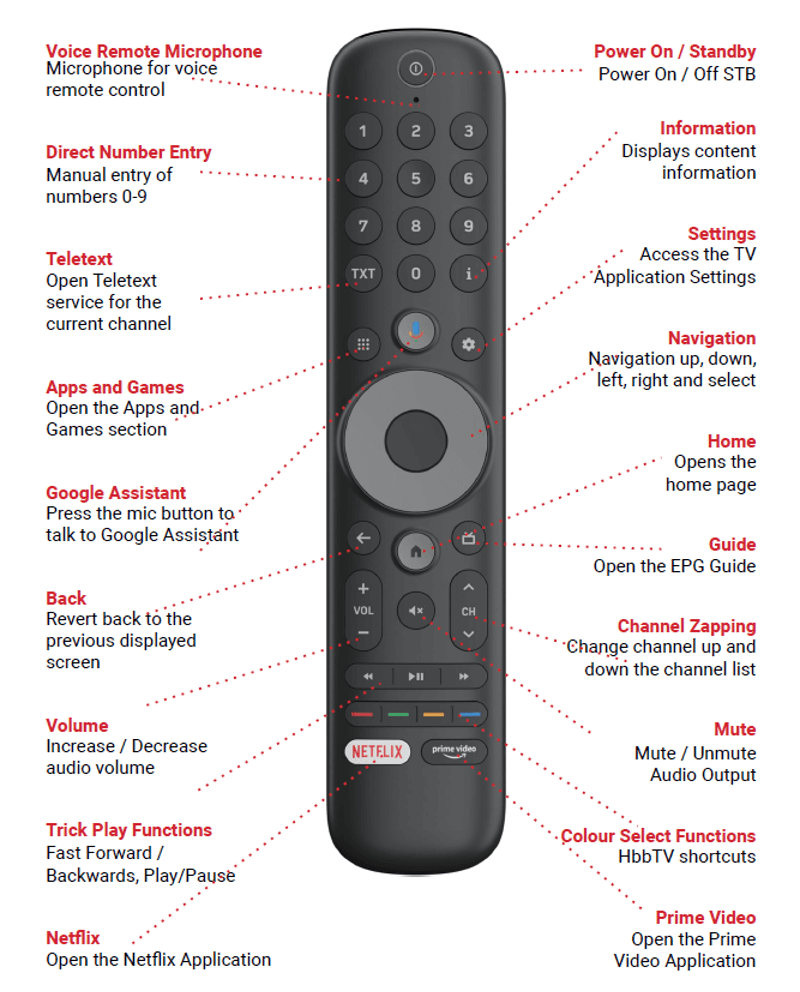
The remote control comes with built-in Bluetooth, so you don‘t need a clear line of sight between the remote control and the TV Box.
After the initial setup and each time you power on the TV Box, it will directly start in TV mode on the last channel you were watching.
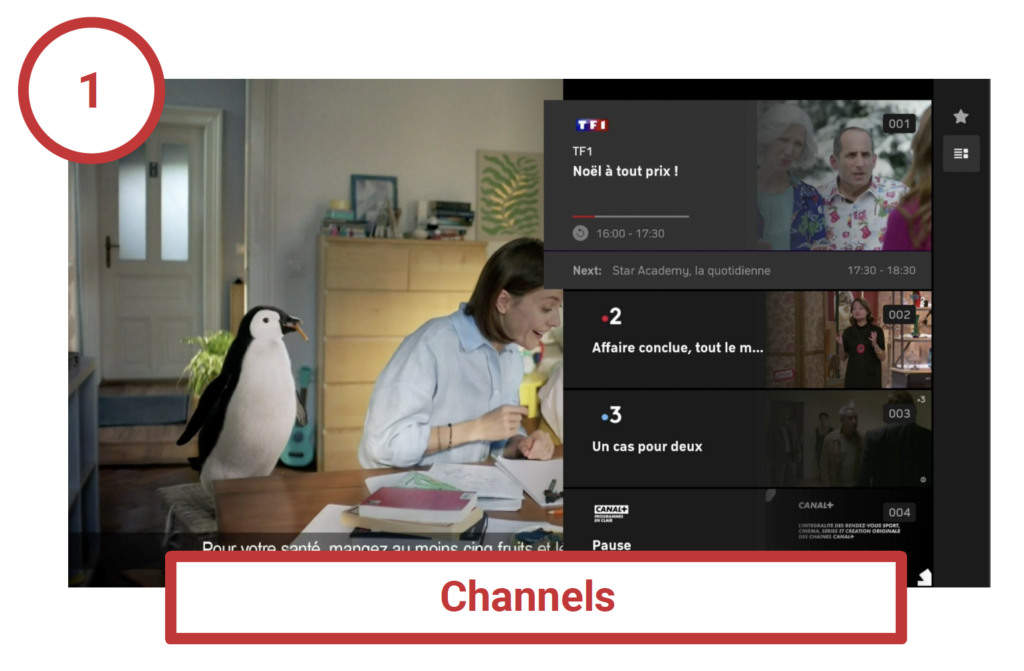
Under “Channels” all available channels and currently running programs are listed in a vertical column on the right hand side of the screen. Alongside the channel logos, the current programs are displayed.
Using the navigation buttons, you can browse through the list of channels and select the next one. Confirm your selection and switch channels by pressing the OK button.
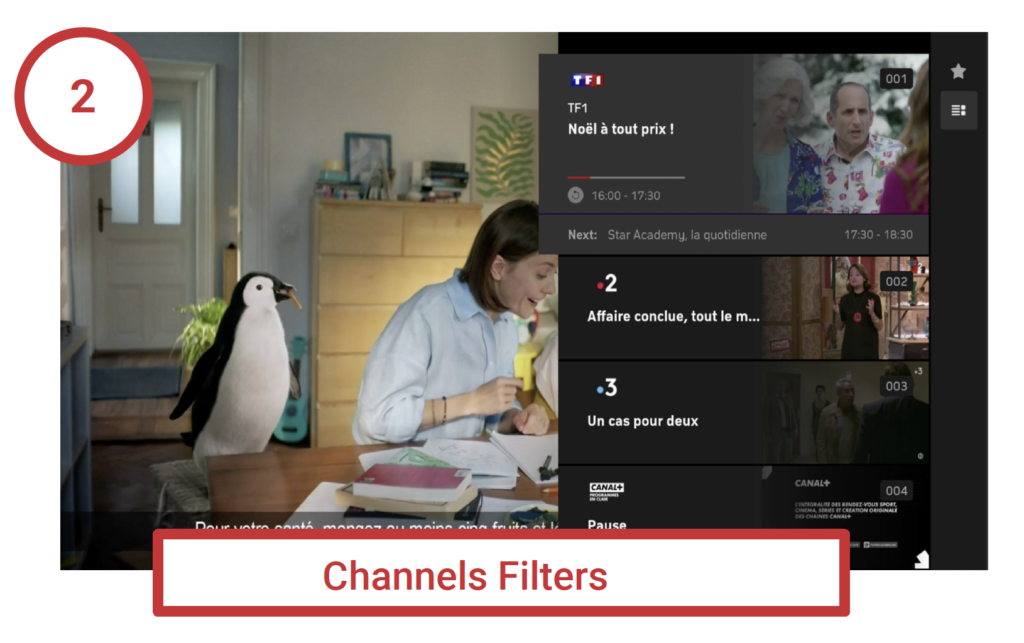
You can also limit the channel list to your favorites.
To do this, press the right navigation button while the channel list is open. Using the star symbol, you can choose whether to display all channels or only your favorites.
See “Setting and Managing Favorites“.
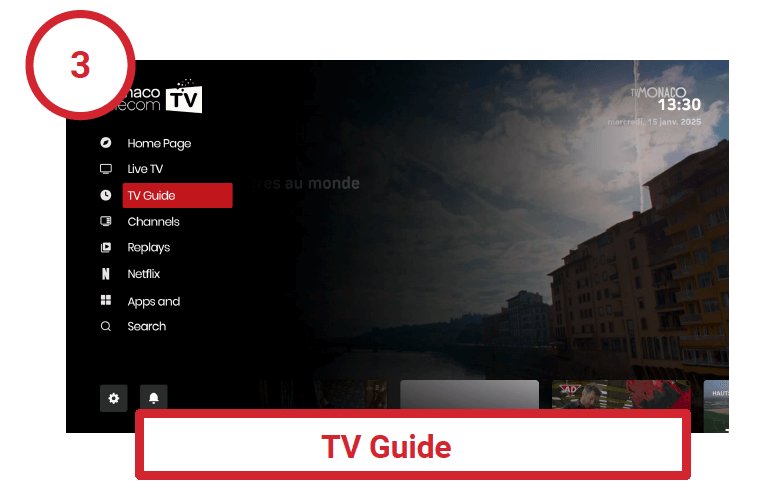
You can open the TV Program through the main menu.
It lists all available channels and displays the available program lineup on a time axis. You can also directly open the TV Program using the GUIDE button on the remote control (see “Remote Control”).

In the TV Program, you can navigate to your desired channel and start watching their program. Additionally, short descriptions of the content are provided for each program.
The guide displays the current and upcoming program, including titles, starting times and durations.The program is shown on a time scale with 30-minute increments, with the colored line indicating the current time.
The list of channels and favorites is represented by the channel logos. You can switch the TV Program view between “All Channels” and “Favorites”.
You can use the direct number entry keys from your remote control to directly access the program of a channel of interest.
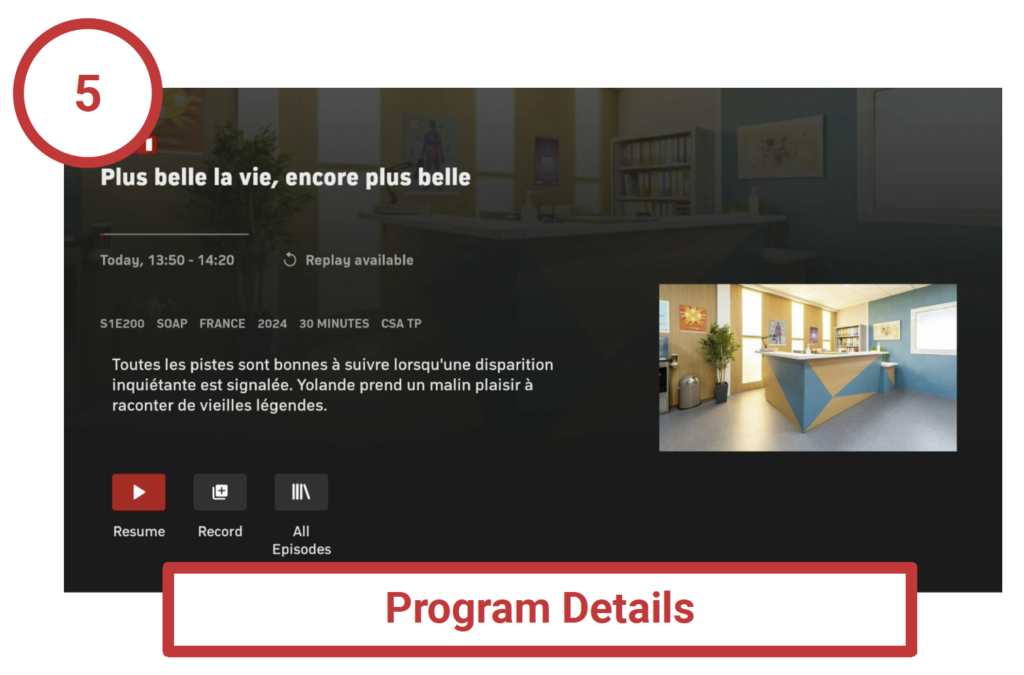
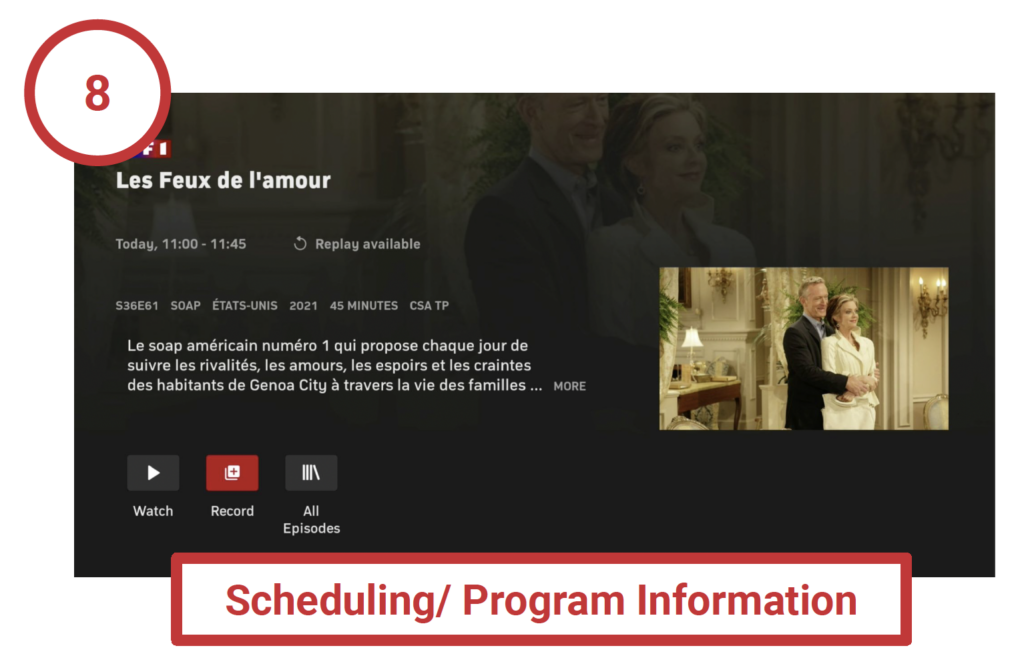
The program details page includes the channel name, program title, and, if applicable, the episode title, along with the date, start, and end time of the program.
Furthermore, detailed information about the program, such as the production year, country, runtime, and a comprehensive description of the content, is provided.
Some programs may include additional details, such as cast and director.
In the program information view, you can also:
- Watch programs by pressing the play
 button.
 - If available, watch programs from the beginning by clicking .

- Record programs by clicking the “Plus”
 button.
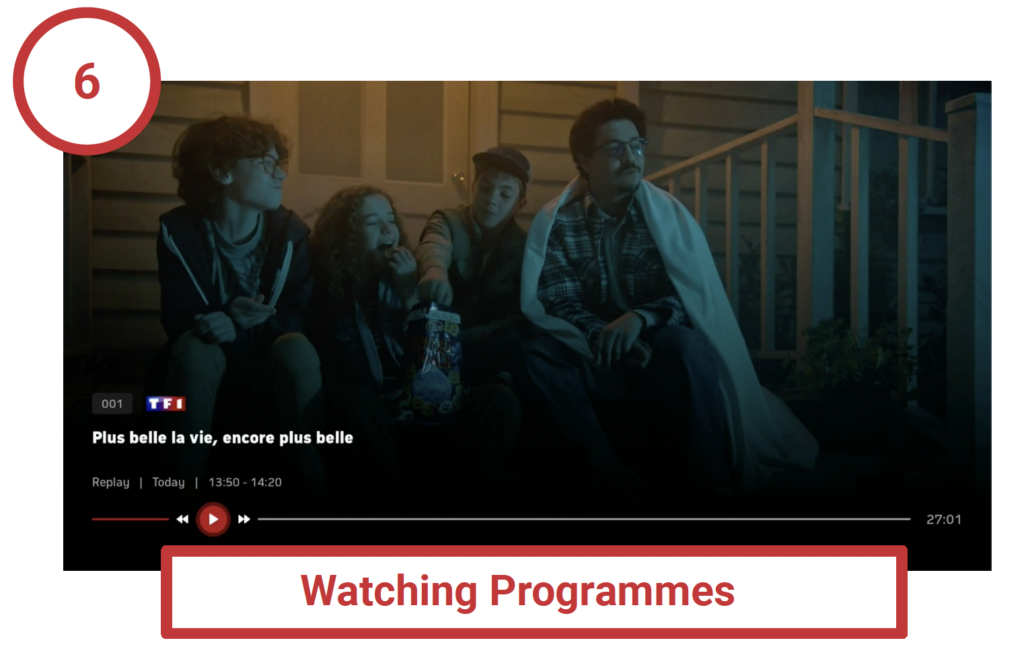
Once you have selected a program, it will start playing. You‘ll have various controls available to adjust settings during playback.
Controls:
- Select language and subtitles
- Jump back (30 seconds)
- Play/Pause
- Schedule a recording for films or series
- Watch programs from the beginning (Replay/Restart)
- Skip forward (60 seconds)
- End timeshift, resume live stream
- End recording for movies or series
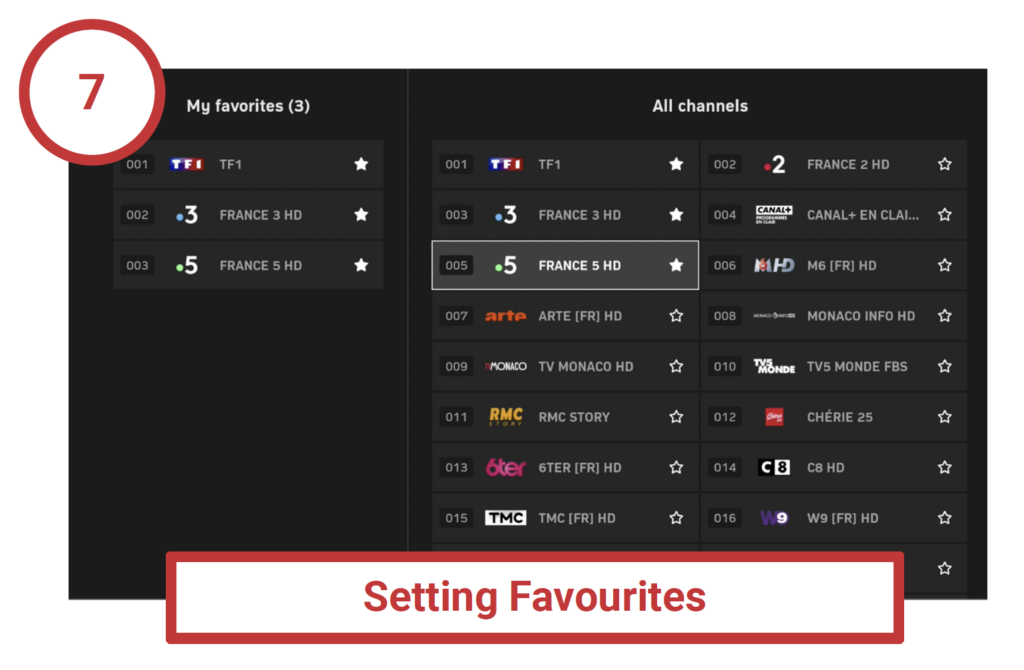
To find your favorite channels quickly, you can create a personal favorites list.
You determine which channels are listed and in what order.
- Press the Settings button
 on the remote control or in the main menu.
 - Choose “Manage Favorites” and press the OK button.
- Highlight the channel you want to add to your favorites and press the OK button.
The star ![]() will be filled to indicate it‘s added to favorites.
will be filled to indicate it‘s added to favorites.
- Highlight the channel you want to remove from favorites and press the OK button.
The star will be empty to indicate it‘s removed from favorites.
- Press the Home button
 on the remote control to apply the settings.
To sort the favorites, highlight the channel you want to move and press the OK button.
Use the arrow keys to move the channel to the desired position in the list and press the OK button.
To schedule a recording, open the program information and click on the Record button.
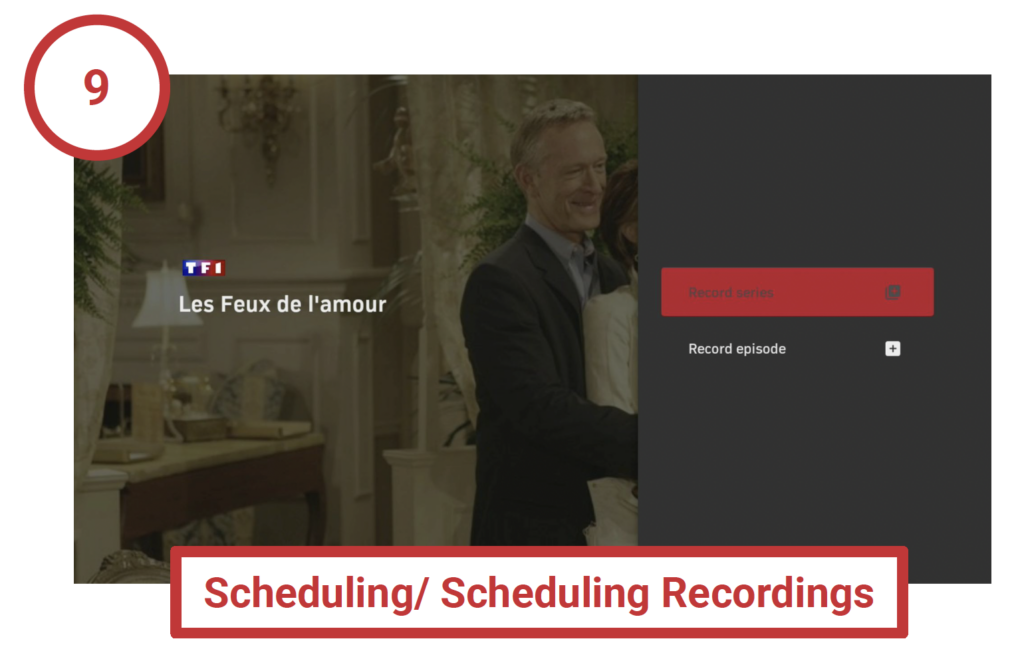
Recording Series: Click on ![]() to record the program. You will have the option to record all upcoming episodes of the series or just one episode.
to record the program. You will have the option to record all upcoming episodes of the series or just one episode.

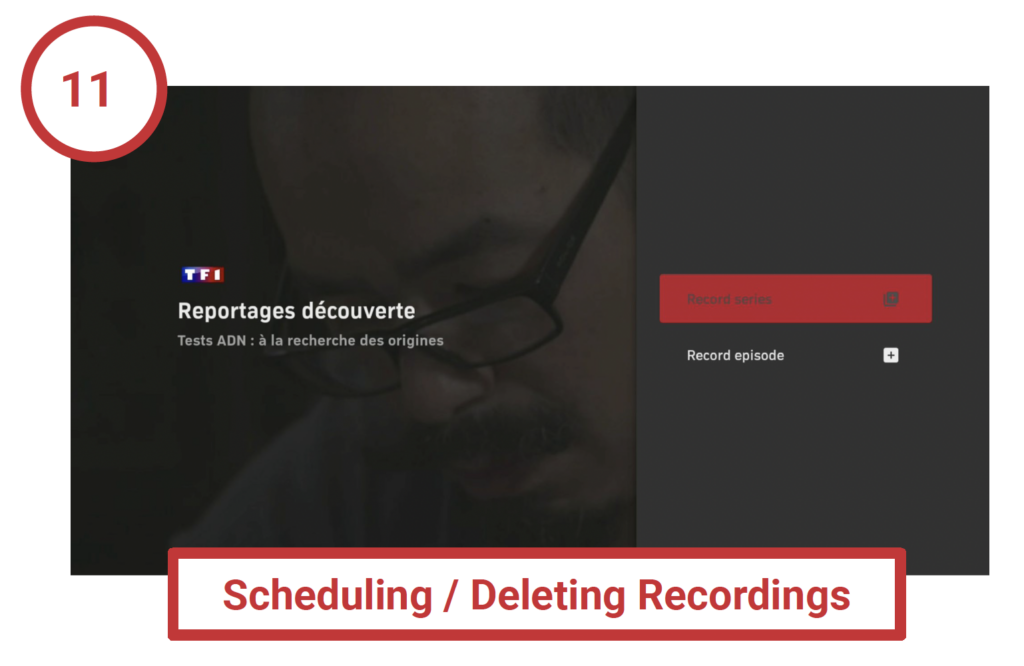
Deleting Recordings: Click on ![]() to delete the series recording or the episode
to delete the series recording or the episode
Cancelling Series Recording: Click on ![]() to stop the series recording.
to stop the series recording.
Deleting Recordings: Click on ![]() to delete the program.
to delete the program.
Series Recording Icons and Meanings
![]() Schedule Series Recording
Schedule Series Recording
![]() Stop Series Recording
Stop Series Recording
![]() Series Recording Planned
Series Recording Planned
![]() Series Recording Ongoing
Series Recording Ongoing
![]() Series / Episode Recorded
Series / Episode Recorded
Single Recording Icons and Meanings
![]() Schedule Single Recording
Schedule Single Recording
![]() Stop Single Recording
Stop Single Recording
![]() Recording Planned
Recording Planned
![]() Recording Ongoing
Recording Ongoing
![]() Recording Completed
Recording Completed

“Recordings” lists all available and scheduled recordings. You can also check the available recording capacity
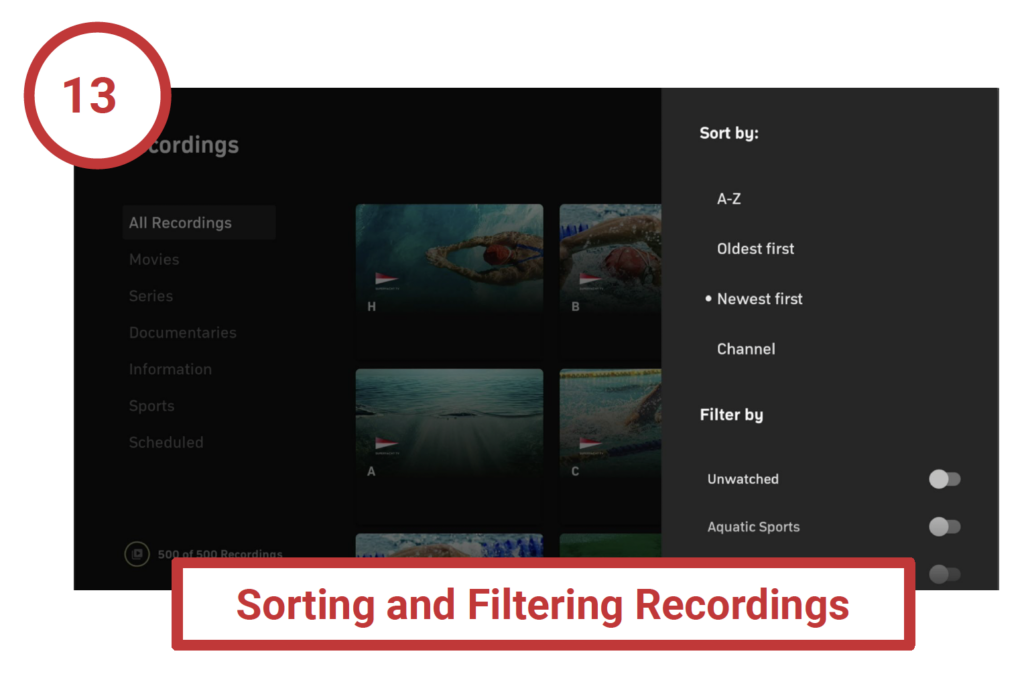
Under “Sorting”, you can arrange your recordings alphabetically, chronologically (ascending or descending), by channels, or by duration.
Under “Filter“, you can view your recordings filtered by different genres or categories.
.
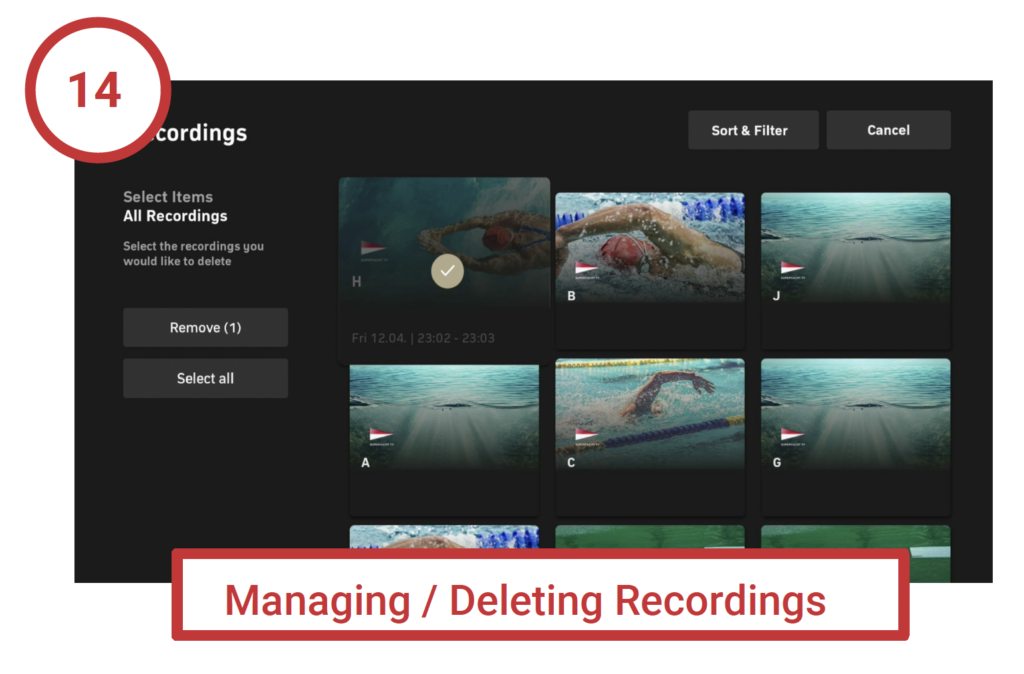
Under “Manage“, you can select all or individual recordings to delete. Sorting and filtering functions are available here for better organization, for example, to show only recordings in the “Film“ category.
Recording Capacity in number of recordings: The graphical circle display shows how much of the available capacity is occupied.
Available Recordings: The recorded programs with preview images are displayed under “Recordings“. You can also choose a category here, such as displaying only series recordings in your recordings. If you select the “Scheduled Recordings“ category, you will see upcoming recordings.
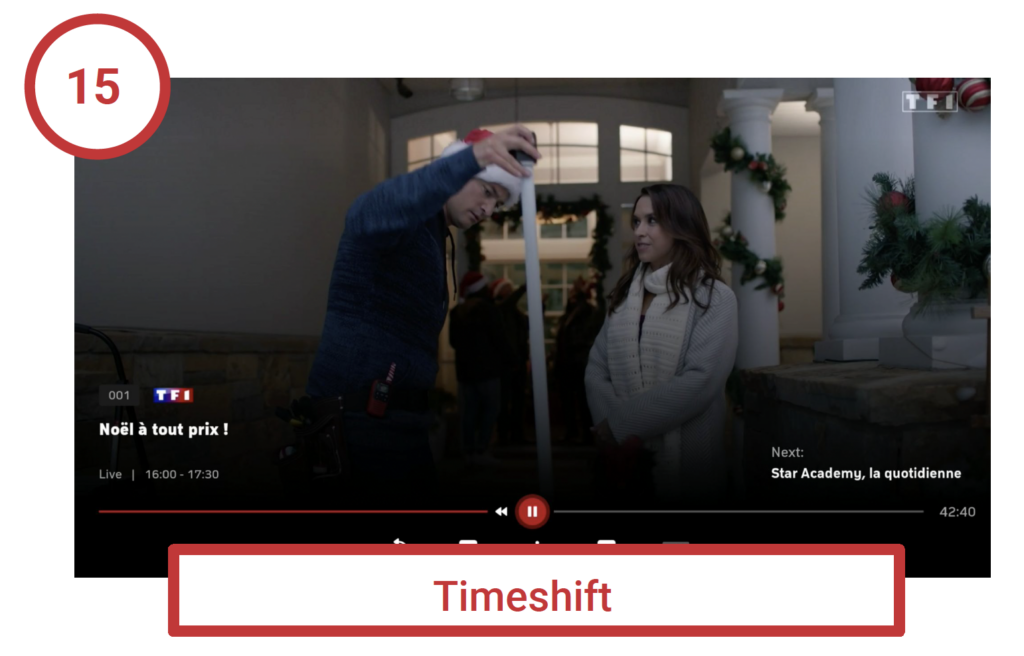
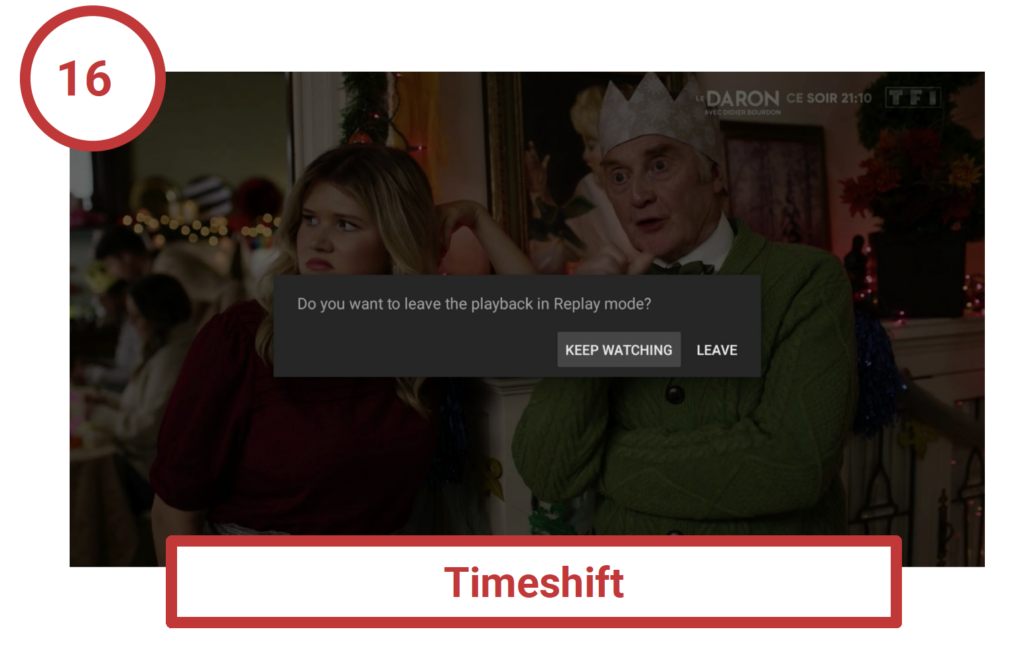
When you press “Select“ while a stream is playing, the control bar appears at the bottom of the screen. From there, you can pause the live program (Timeshift), record it, change the audio channel, or add subtitles if available.
Please note: Timeshift availability depends on channel rights and may not be available for all channels.
When you switch to another live channel, you return to the live program.
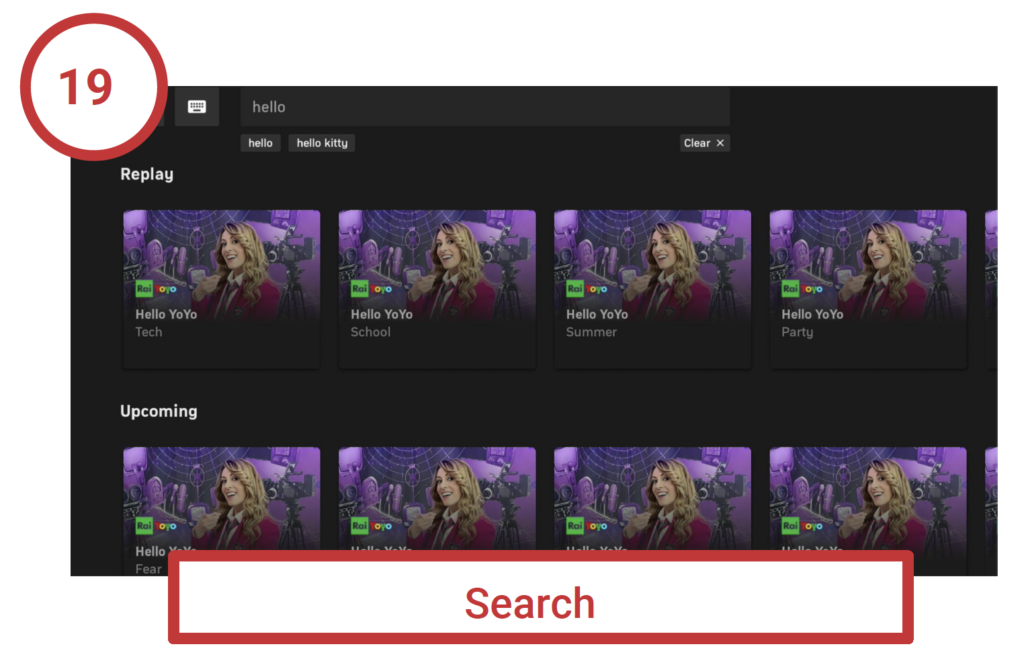
Using the search function from the main menu, you can find programs that have already aired and can be replayed, but also live, upcoming and recorded content.
To enter the search using the keyboard, select “Keyboard Input“ and press the “OK“ button. Enter your search query using the on-screen keyboard.
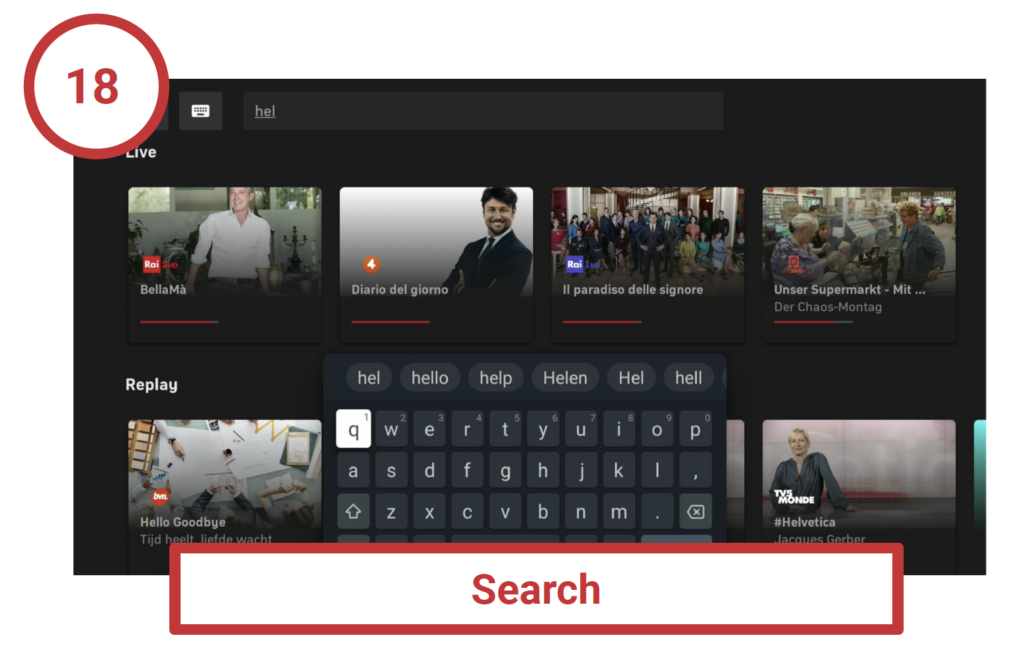
To perform the search using voice control, select “microphone“ and press the “Select“ button, you can then speak your search query into the microphone.
Note: For the first use of the voice function, you must grant permission for audio recordings to be made for this purpose.
All your live TV channels as well as your recordings are accessible on your smartphone via the MonacoTelecomTV app.
All your live TV channels as well as your recordings are accessible on your computer via this link.
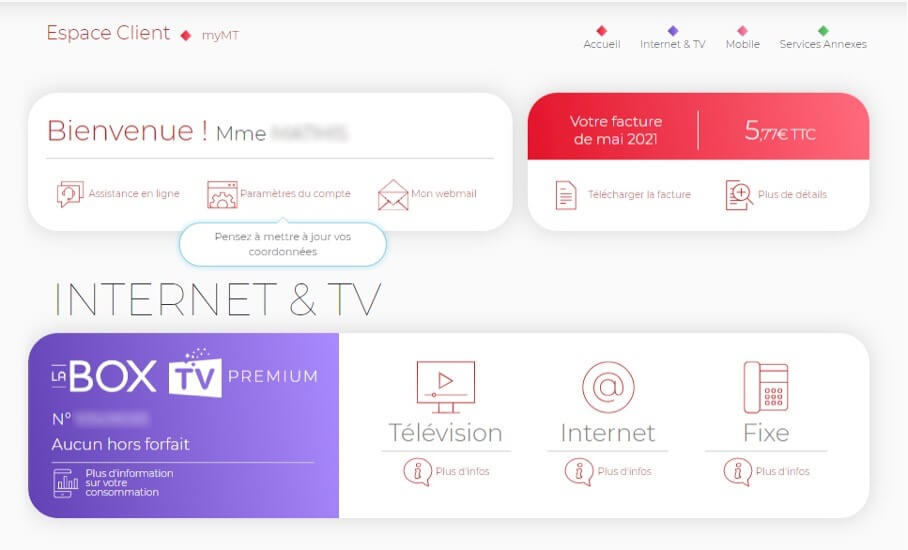
Simply go to your myMT Customer area.

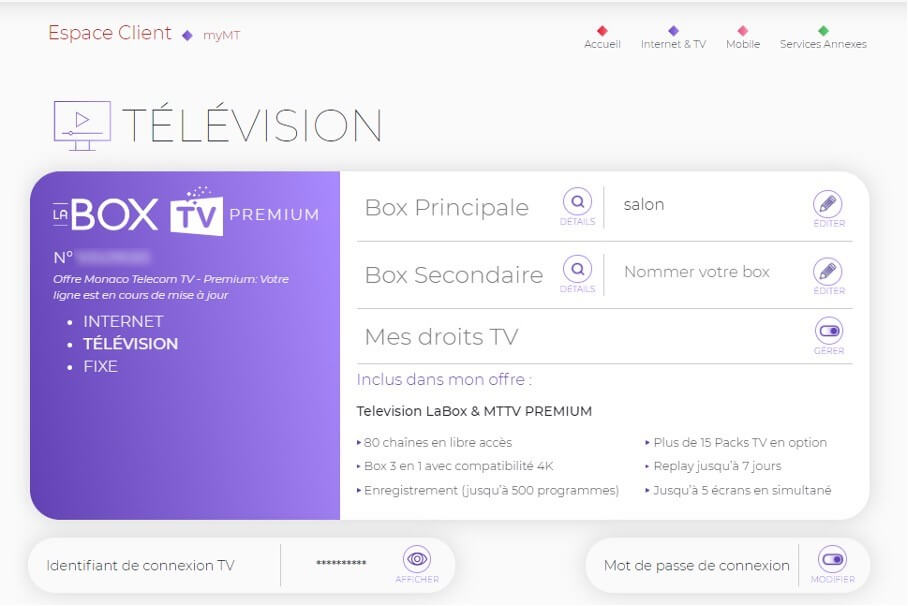
From your myMT homepage, go to the TV section by clicking on “more info”
Click “edit” in the “login password” section to change your password.
If your TV Box isn't working properly, you can reset it to factory settings, which may solve the problem.

- Press the Settings button on the remote control or in the main menu.
- Choose “More“ under Settings and press the OK button.
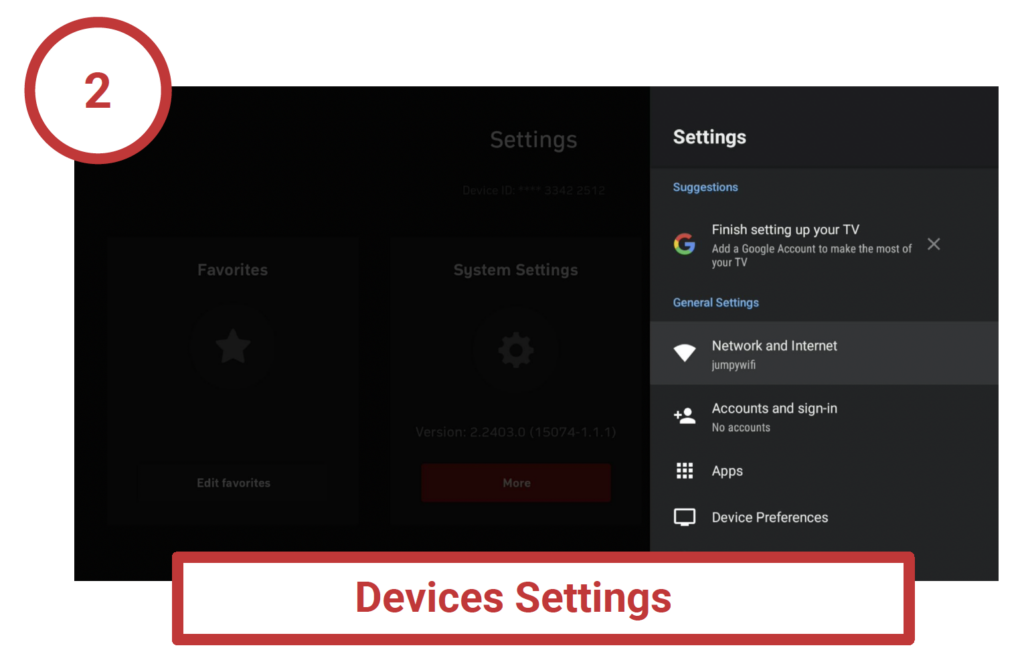
Now, select Device Settings and press the OK button.
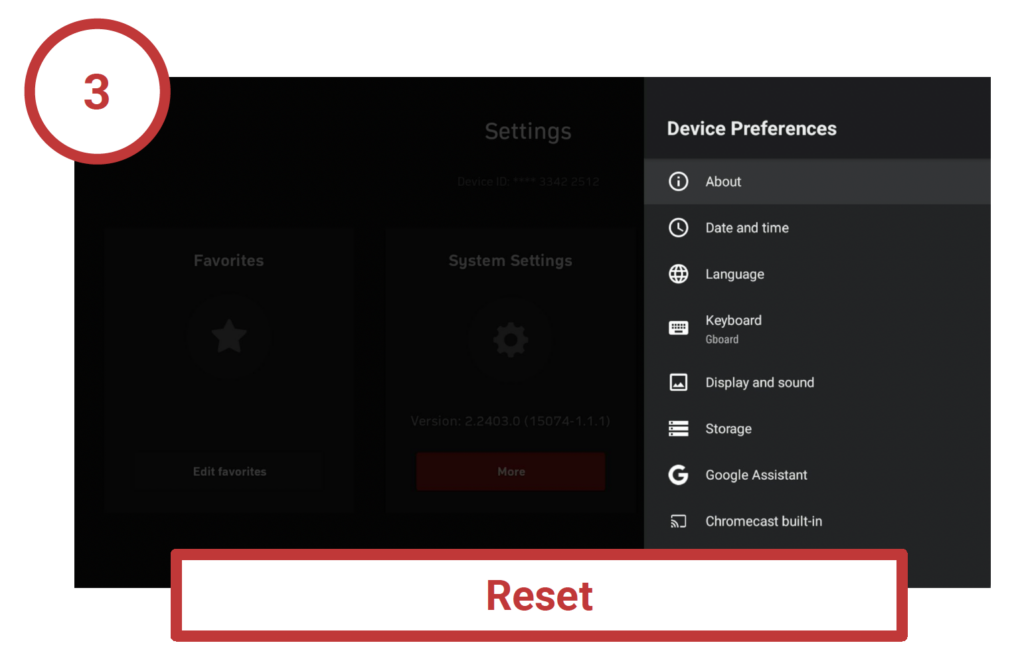
Select “About“ and then “Factory reset“
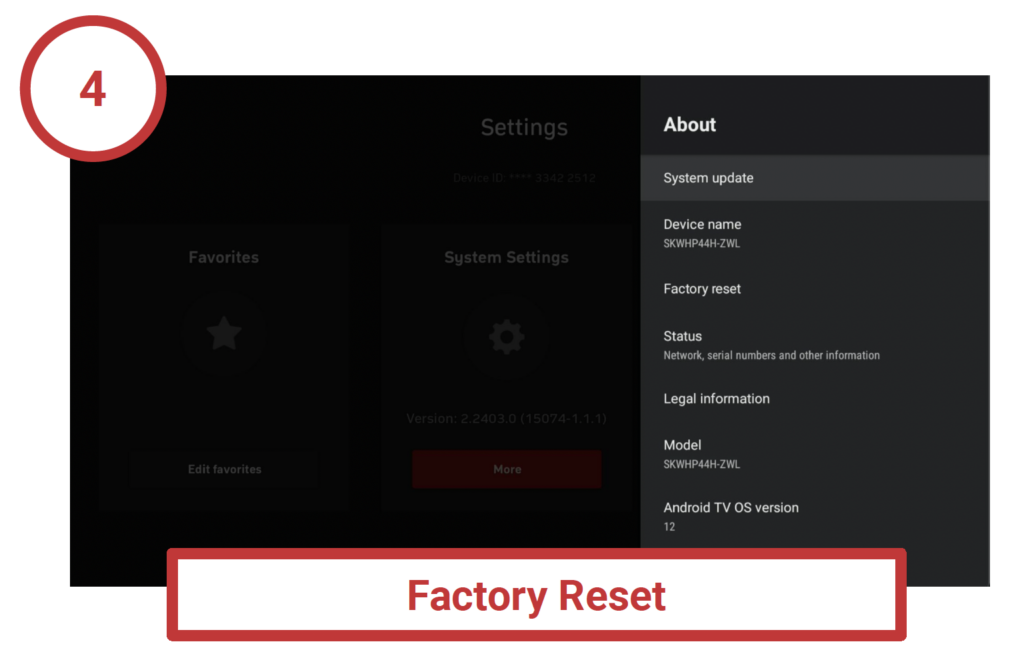
Confirm that you want to reset the TV Box. The factory settings will be loaded.
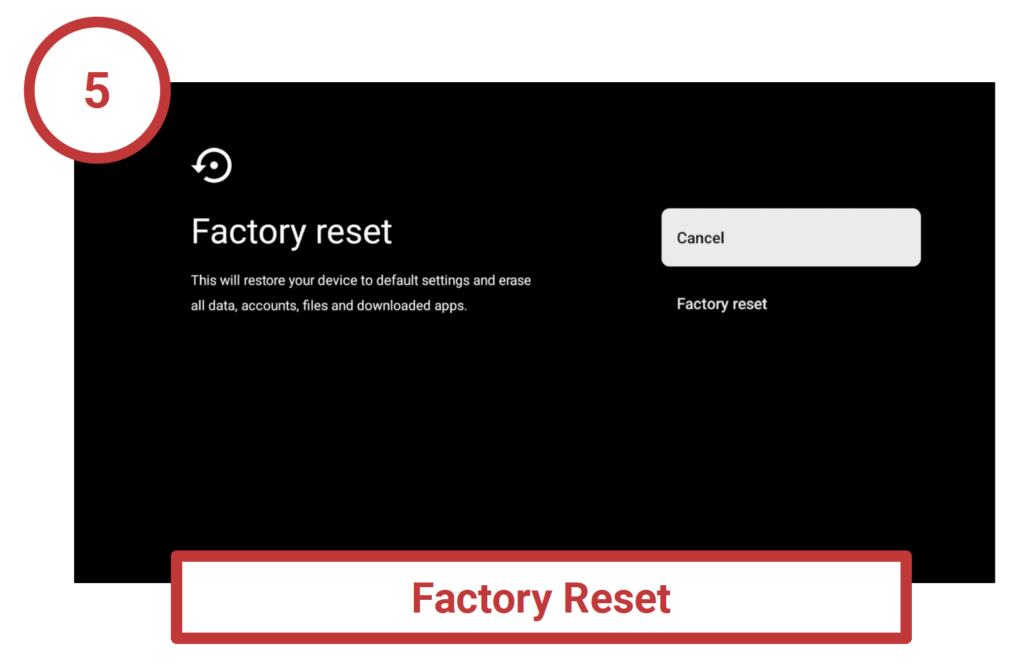
See “First Installation” > “Initial Setup” to set up your TV Box again.
If your Wi-Fi password changes or you want to connect your TV Box to a different Wi-Fi network, you can adjust this setting through the device settings.
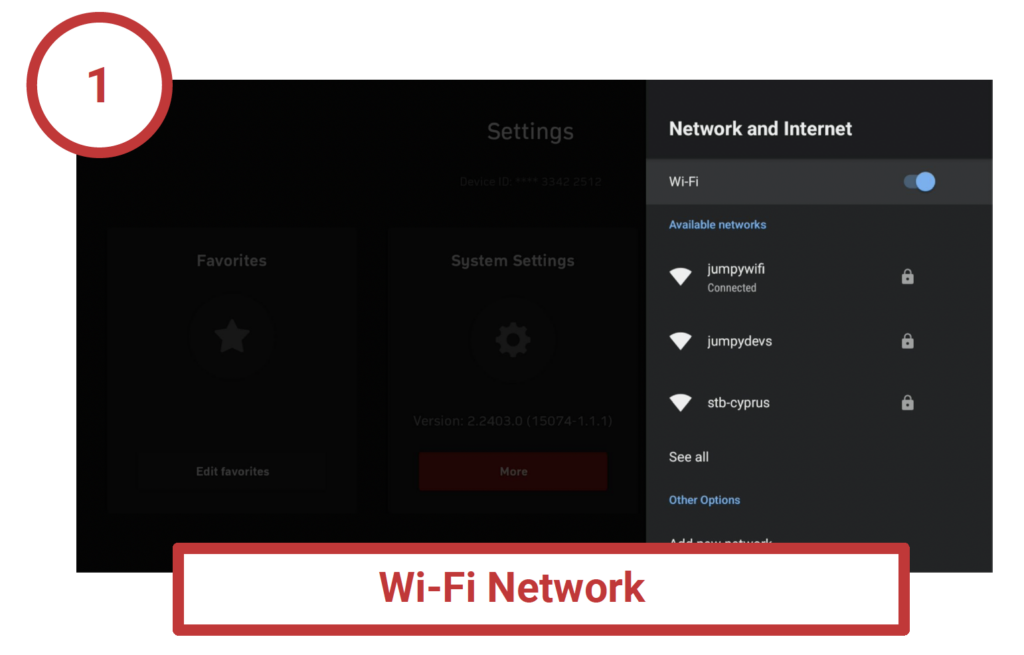
- Press the Settings button on the remote control or in the main menu.
- Choose “More“ under Settings and press the OK button.
- Select “Network & Internet“ and choose the desired network from the list.
In case of a defect with your TV Box and when contacting our support, you may be asked to provide the serial number or software version of your MonacoTelecomTV app.
To retrieve this information, follow these steps:
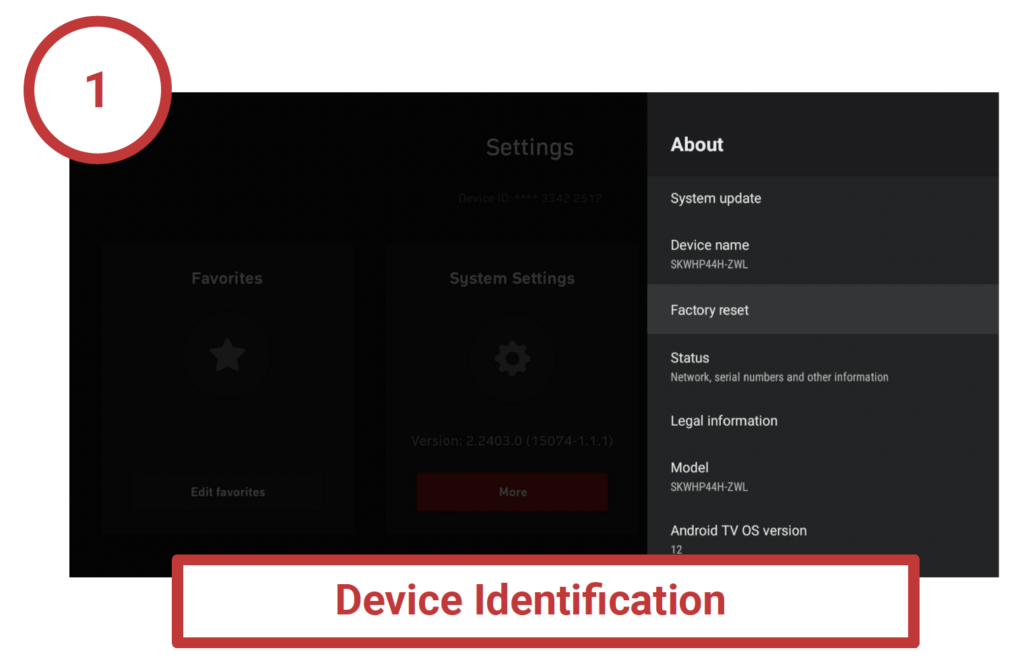
- Press the Settings button on the remote control or in the main menu.
- Choose “More“ under Settings and press the OK button.
- Choose “Device Preferences“
- Choose “About“
- Then select “Status“ button
- In this menu, you will find the serial number of your device as well as the current software version of the operating system.
